*현재 validation 미통과시 js로 오류메시지를 alert하도록 설정했는데
추후엔 오류메시지를 타임리프를 활용하여 변경할 예정이다.
SignupDto
- 회원가입 관련 DTO로, 회원가입 폼에서 전달한 데이터를 담는 역할을한다.
- @Valid의 대상이된다.
- toEntity() 메소드는DTO로 받은 회원데이터를 User객체로 변환해준다.
@Data
public class SignupDto {
    @Size(min=2, max = 20)
    @NotBlank
    private  String username;

    @NotBlank
    private  String password;

    @NotBlank
    private  String email;

    @NotBlank
    private  String name;

    public User toEntity(){
        return User.builder()
                .username(username)
                .password(password)
                .email(email)
                .name(name)
                .build();
    }
}
AuthController
- 사실 프론트 단에서 유효성 검사하는것으로도 끝낼 수 있지만 데이터를 프론트가 아닌 다른 방법
(ex postman)으로 전송할 수 있으니까 백엔드 단도 구성했다.
- SignupDto에서의 유효성 검사가 하나라도 실패하면 실패한 것들이 AuthController의 signup 메소드의 bindingResult에 담긴다.
- bindingResult에 에러가 하나라도 있으면 errorMap 이라는 이름에 Map에다 에러 정보를 담는다.
- 다 담기면 CustomValidationException을 throw한다. 이때 메시지("유효성 검사 실패함")와 errorMap을 파라미터로 넘긴다.
- 오류가 없다면 회원가입 진행 후 "auth/signin"페이질 이동
@PostMapping("/auth/signup")
public String signup(@Valid SignupDto signupDto, BindingResult bindingResult) {

    //프론트 단에서 유효성 검사해도 postman 전송할 수 있으니까
    if (bindingResult.hasErrors()) {
        Map<String, String> errorMap = new HashMap<>();

        for (FieldError error : bindingResult.getFieldErrors()) {
            errorMap.put(error.getField(), error.getDefaultMessage());
        }
        throw new CustomValidationException("유효성 검사 실패함", errorMap);
    } else {
        //User < - SingupDto
        User user = signupDto.toEntity();
        User userEntity = authService.register(user);
        return "auth/signin";
    }
}
CustomValidationException.class
- CustomValidationException 은 RuntimeException을 상속받는다.
- 생성자는 String 타입의 메시지와 Map 타입의 errorMap을 매개변수로 갖는다.
- getErrorMap() 메소드는 errorMap을 리턴한다.
public class CustomValidationException extends RuntimeException{

    //객체를 구분할때
    private static final long serialVersionUID = 1L;

    private Map<String, String> errorMap;

    public CustomValidationException(String message, Map<String, String> errorMap){
        super(message);
        this.errorMap = errorMap;
    }

    public Map<String, String > getErrorMap(){
        return errorMap;
    }
}
ControllerExceptionHandler.class
- @ControllerAdvice 는 모든 Exception들을 낚아챈다.
- @ExceptionHandler(CustomValidationException.class)를 선언해줌으로써 모든 CustomValidationException을 이 함수가 가로챈다.
- 리턴값은 back이라는 정적메소드에 파라미터로 errorMap을 String으로 변환시켜 전달해준다.
@RestController
@ControllerAdvice
public class ControllerExceptionHandler {

    @ExceptionHandler(CustomValidationException.class)
    public String validationException(CustomValidationException e){
        return Script.back(e.getErrorMap().toString());
    }
}
Script.java
- validationException의 리턴값을 설정해준다.
- 자바스크립트 코드를 문자열화해서 리턴해준다.
public class Script {

    public static String back(String msg){
        StringBuffer sb = new StringBuffer();
        sb.append("<script>");
        sb.append("alert('"+msg+"');");
        sb.append("history.back();");
        sb.append("</script>");
        return sb.toString();
    }
}'Study > SpringBoot' 카테고리의 다른 글
| [Springboot] user follow 설정 (0) | 2022.05.20 |
|---|---|
| [Springboot] 회원정보 수정1 - 로그인한 유저 정보 보이기 (0) | 2022.05.18 |
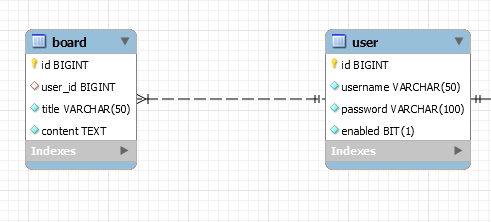
| [SpringBoot] 사용자- 게시글 one-to-many, many-to-one 관계설정 (0) | 2022.05.12 |
| [SpringBoot] 로그인 및 회원가입 처리 -(Spring Security 사용) (0) | 2022.05.11 |
| [SpringBoot] 타임리프 if문 (0) | 2021.11.29 |